

Our recipe for homemade gingerbread houses has three different reusable templates for you to choose from to make the type of house that works for you. We’ve perfected this recipe by making it hundreds of times, and we’re sharing all our top tips so you can make these as easily as possible.
Our recipe costs around $9.05 to make 8 houses. That works out to cost approximately $1.13 per house.

Table of Contents
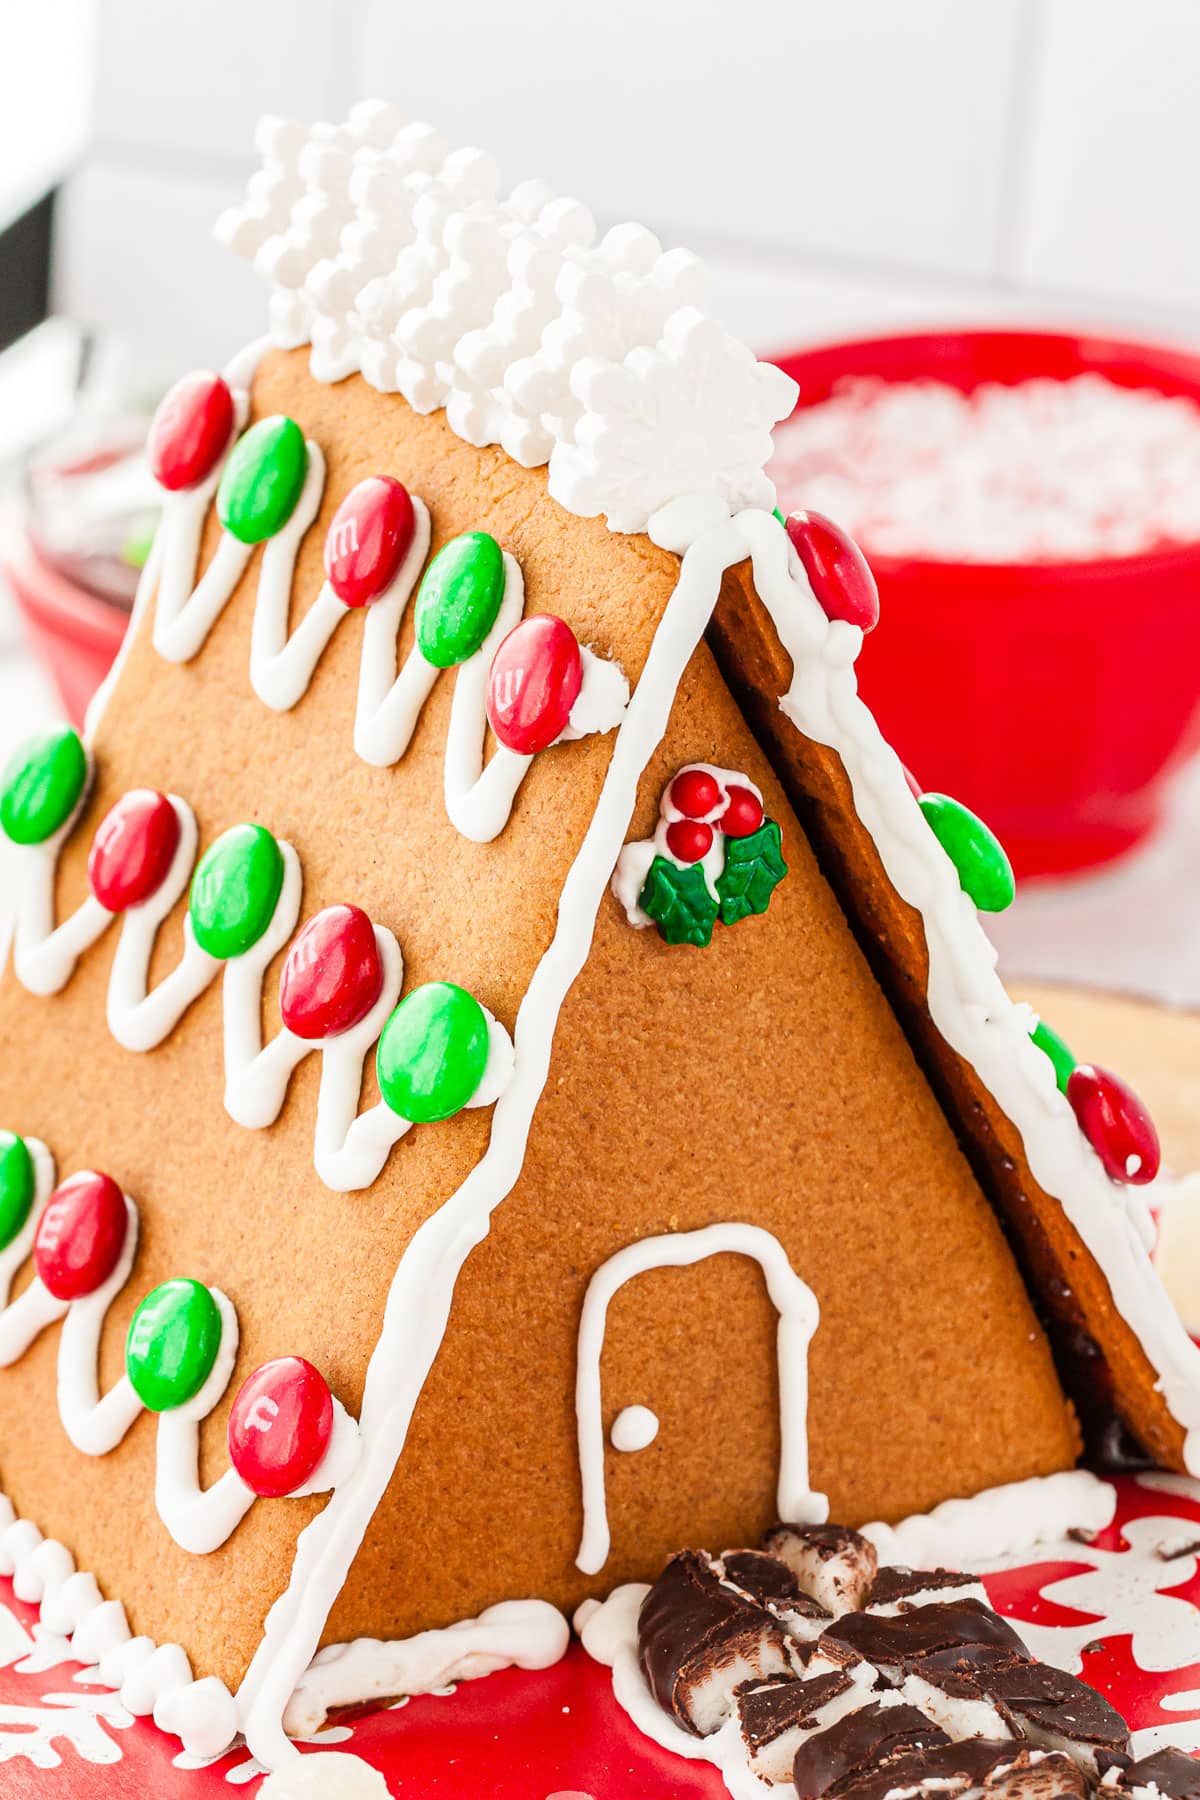
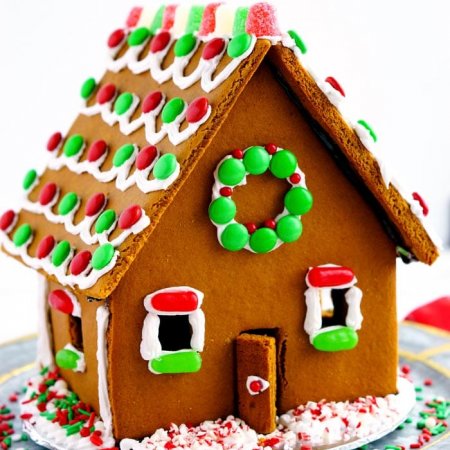
Homemade Gingerbread House
If this is your first time making a homemade gingerbread house, our step-by-step fail-proof instructions will help you become a pro at making your own gingerbread houses so you never have to buy an expensive kit again.
If you are an experienced gingerbread house maker, you will appreciate the three different-sized house templates we provide you with. The recipe makes two large houses, four small houses, or eight A-frame gingerbread houses.
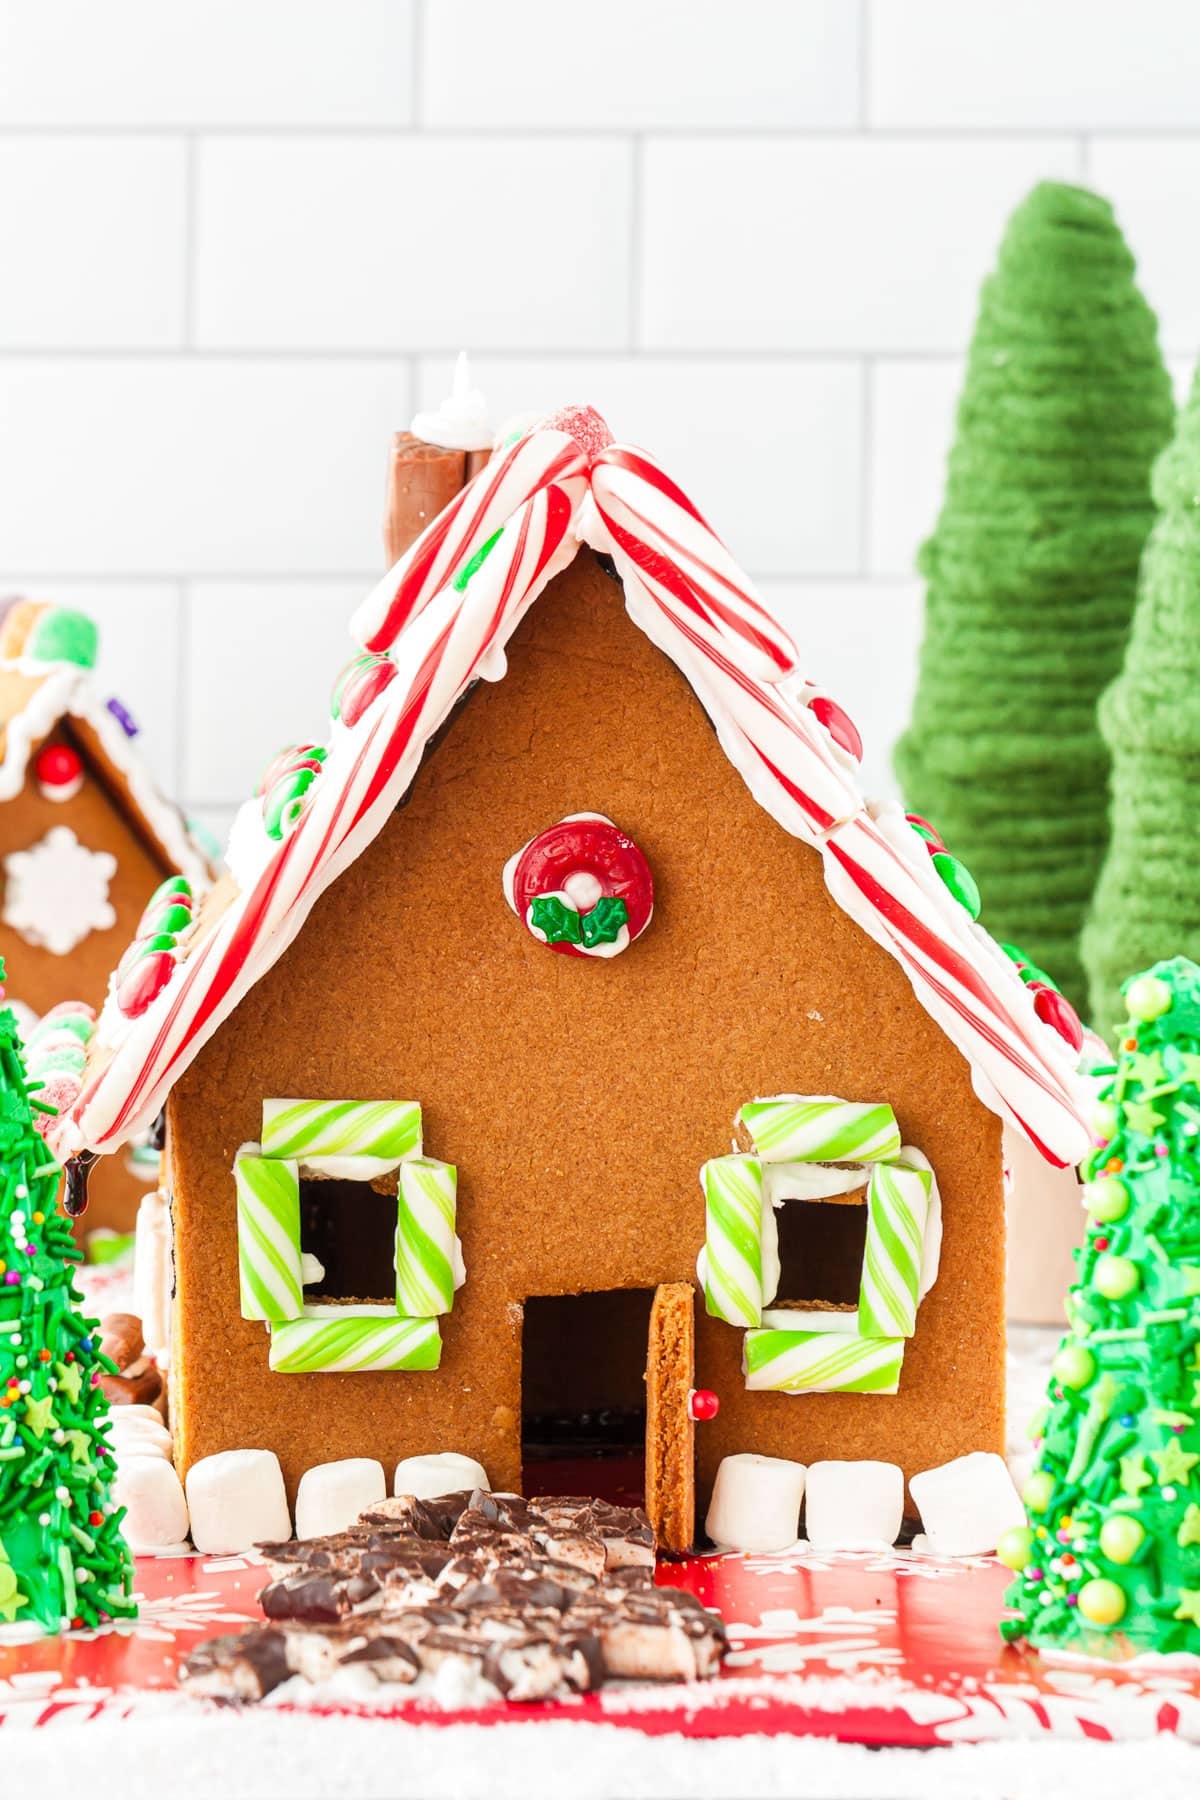
You can make eight A frame houses with this one recipe. This is the perfect size for each kiddo to decorate. And they are quick and easy to make. This is a great option if you want to make and decorate houses all in one day.
What You’ll Love About This Homemade Gingerbread House Recipe:
- Affordability: It costs less to make these houses homemade than it does to buy a kit from the store. We use shortening instead of butter. It tastes just as good and costs less.
- Time-Saving Recipe: With our recipe, there is no need to chill the dough. You can begin rolling and cutting the dough immediately after making it.
- Sugar Glue: Our Our recipe uses sugar glue to assemble the houses instead of royal icing. This saves time as it dries faster and is less expensive to make. We save the royal icing for decorating!
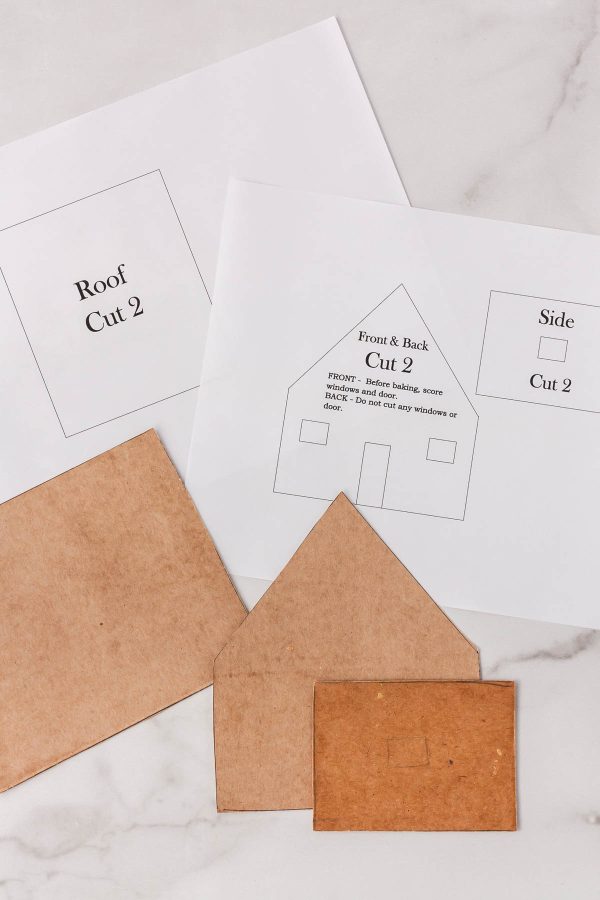
- Reusable Templates: Cut the templates on a cereal box, and they will last for several years.
- Adorable A Frame Gingerbread House: This year, we added a new template for an A Frame Gingerbread House. Using the template, this recipe will make eight houses.
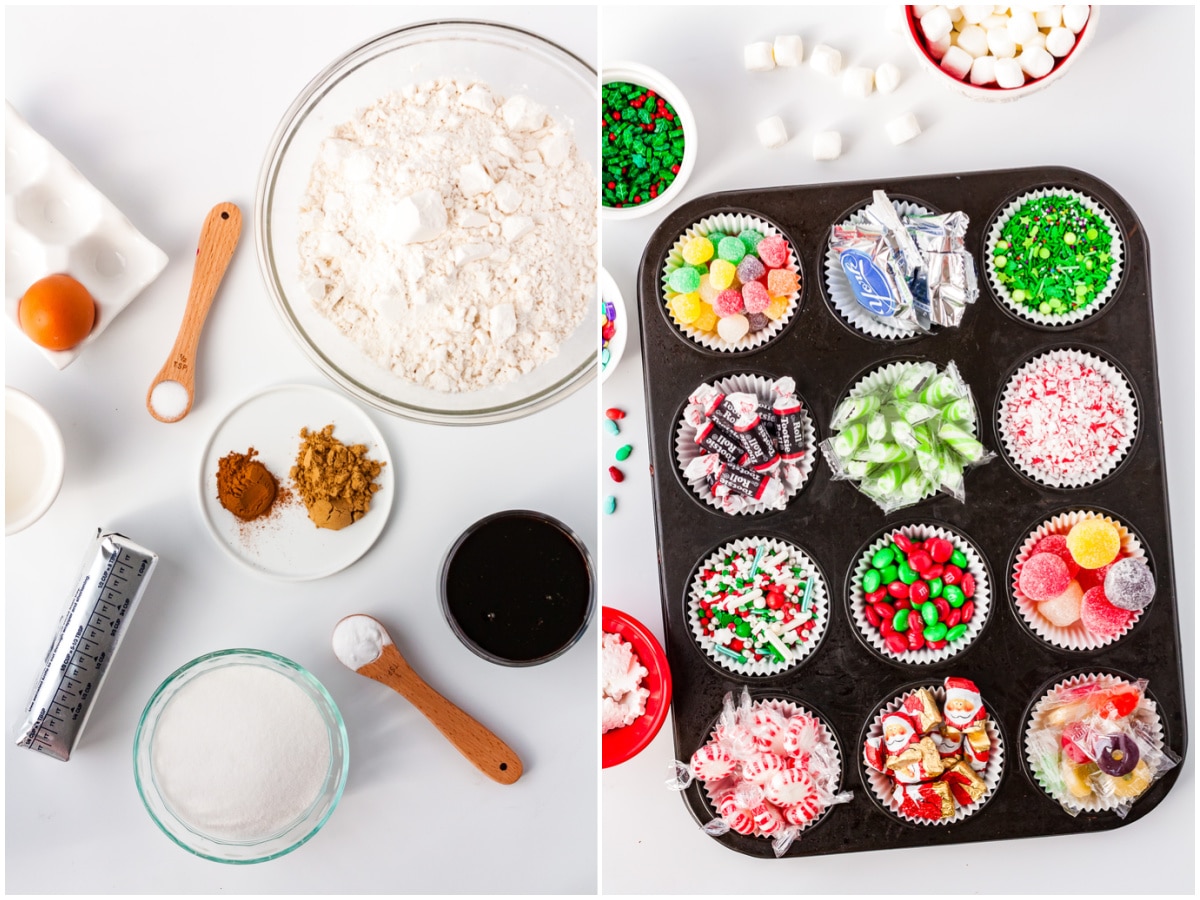
Ingredients & Estimated Cost:
- 1 cup vegetable shortening – $0.56
- 1 cup granulated sugar – $0.30
- 2 Tablespoons white vinegar – $0.02
- 1 cup molasses – $3.32
- 1 large egg – $0.22
- 5 cups all-purpose flour – $0.60
- 1 1/2 teaspoon baking soda – $0.02
- 2 teaspoons ground ginger – $0.48
- 1 teaspoon cinnamon – $0.06
- 1/2 teaspoon salt – $0.01
- 2 cups granulated sugar – $0.60
- 6 tsp Wilton Meringue powder – $1.26
- 6 Tablespoons water – $0.00
- 4 cups powdered sugar – $1.60
***Note: This estimate does not include the price of the candies you will use to decorate the houses.
The recipe cost is calculated by the amounts needed for the recipe. To find out more about how we price our recipes, check out Budget Recipes Explained. The pricing for this recipe was updated in November 2024.
How to Make Homemade Gingerbread Houses
***For complete recipe instructions, see the recipe card below.
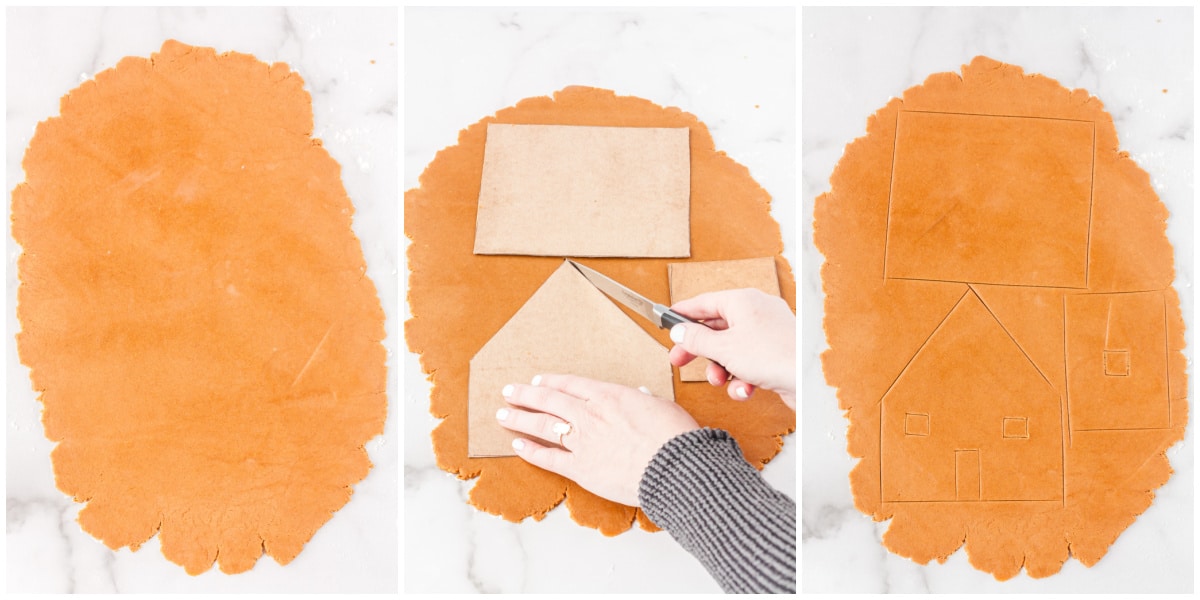
First, print off the Gingerbread House template, then cut it out, trace it onto a cereal box, and then cut it out.
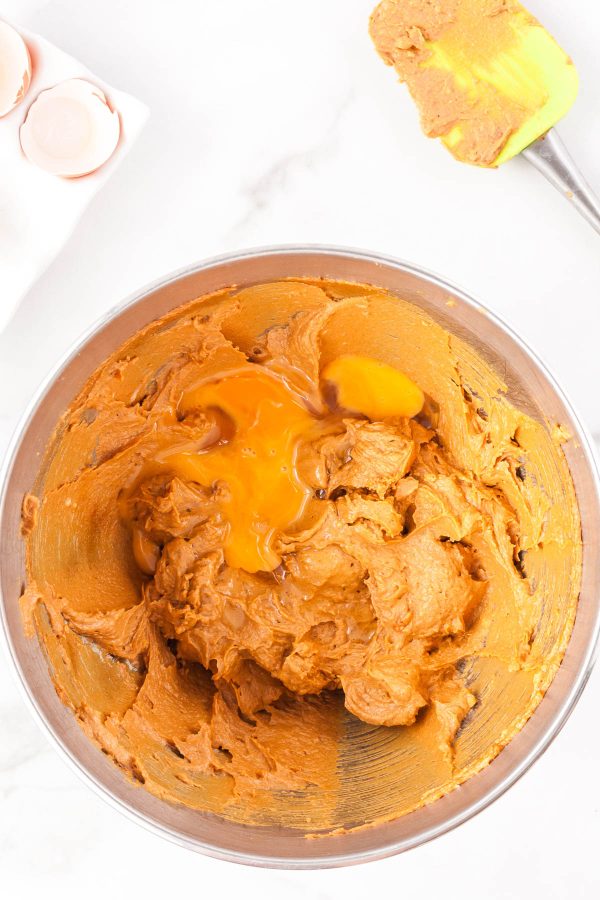
Next, mix together the shortening, sugar, molasses, vinegar, and egg.
Mix dry ingredients and add to the molasses mixture, ensuring you mix it well with a paddle attachment, not a dough hook. The dough will be crumbly until kneaded together.
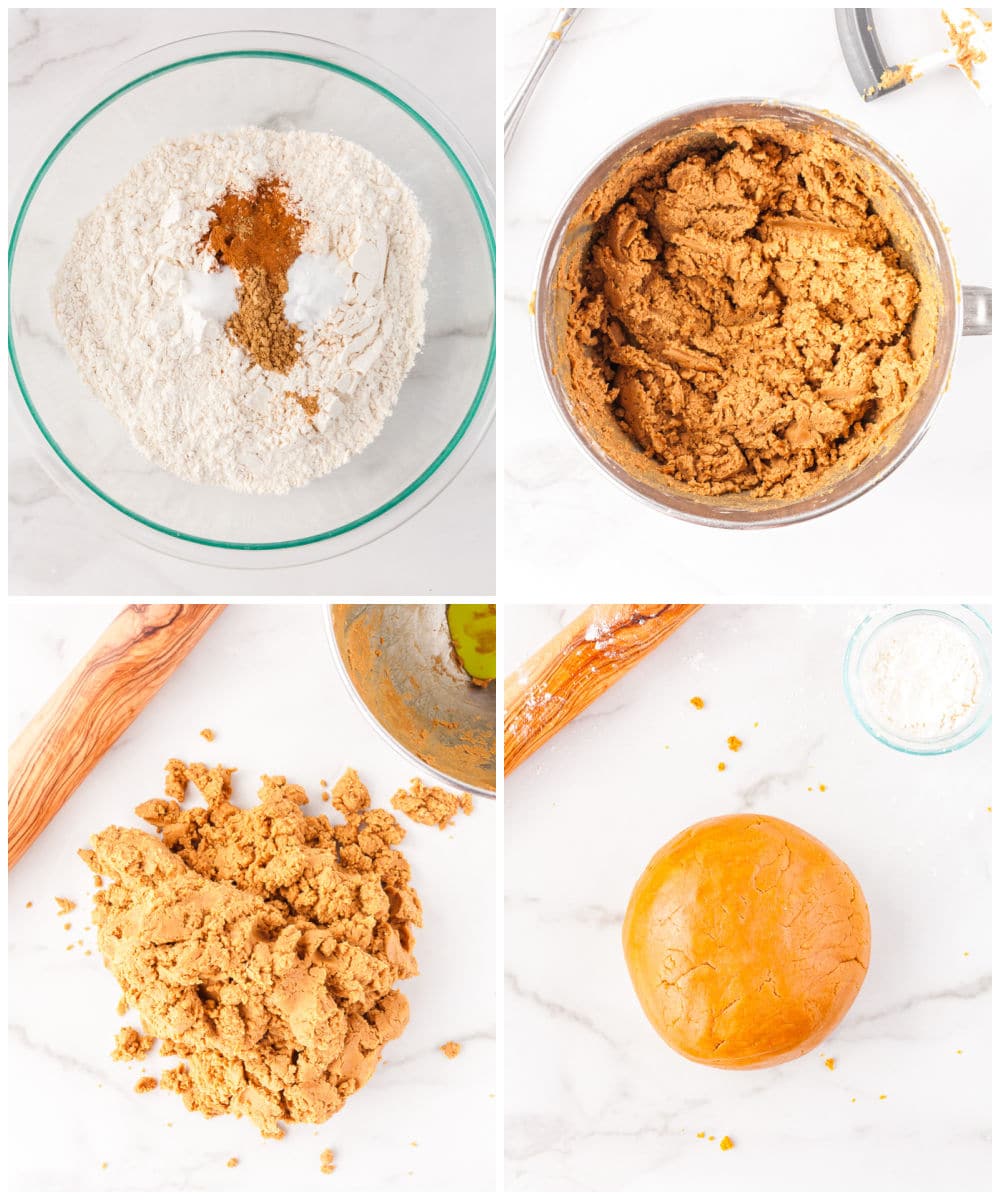
Next, roll the dough onto parchment paper or a lightly floured countertop. Place the template, print side down, and cut out the gingerbread house pieces except for the windows and doors. Lightly score where the door and windows will be, but do not cut them out completely.
Pick up the cutout dough on the parchment paper and place it on a cookie sheet. Or you can use one of the roof template pieces to lift the cutout gingerbread pieces and place them on greased cookie sheets – straighten pieces once on the cookie sheets if necessary.
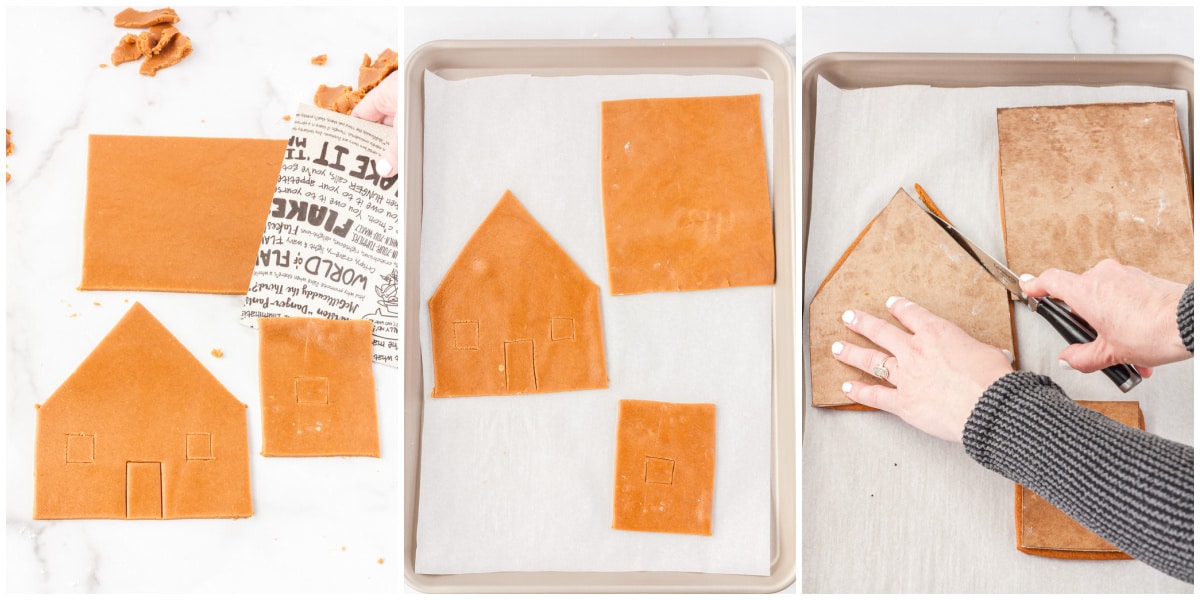
Bake at 350 degrees for 11-14 minutes for the larger houses or 8-10 minutes for the smaller houses. As soon as the pieces come out of the oven, quickly re-cut edges for straight lines. The ’ A-frame’ style will need to have the triangle pieces trimmed immediately after coming out of the oven, or the ‘roof’ pieces will not sit flush against each other.
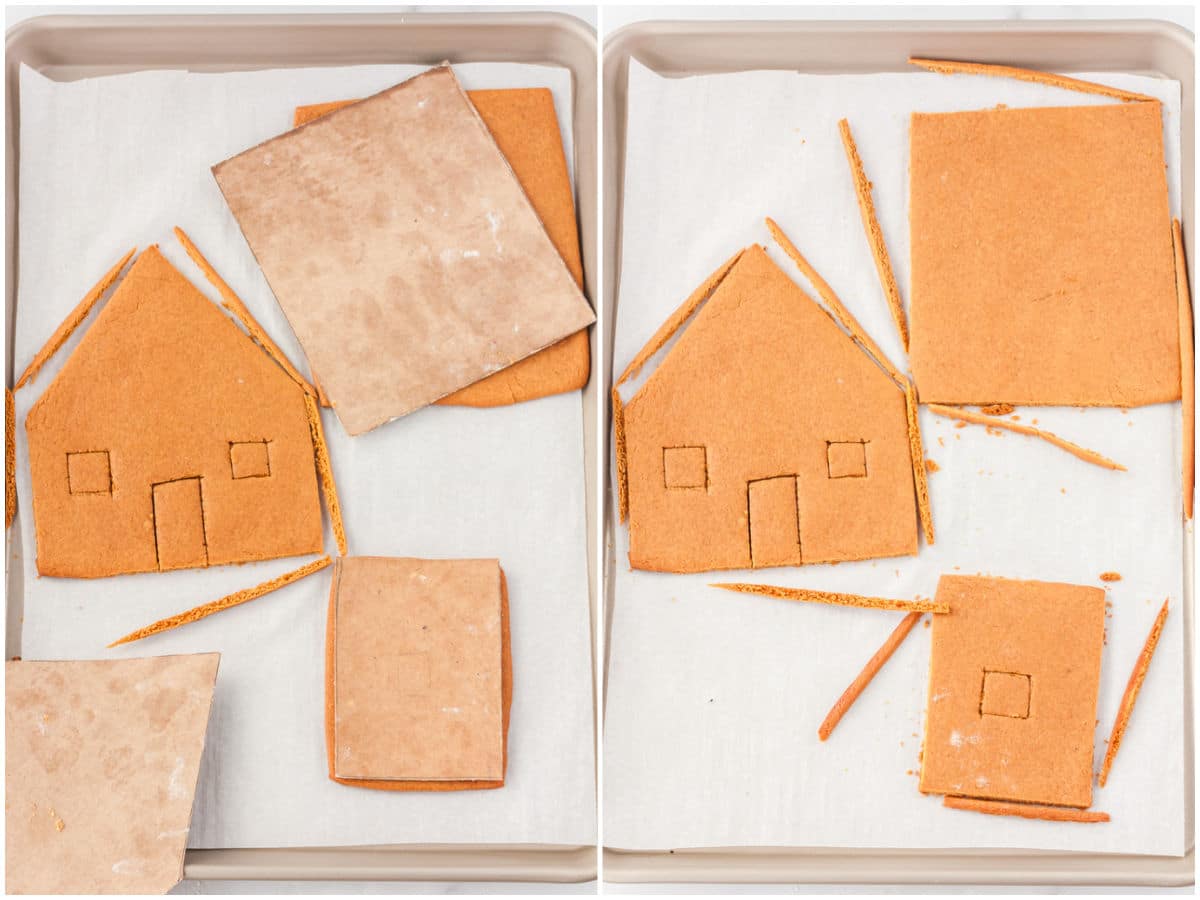
Next, cut out the windows and door completely. Place pieces on a cooling rack to cool completely.
First, to assemble the houses, wrap a piece of sturdy cardboard (Amazon boxes or Pizza box lids work great) in foil or fun holiday wrapping paper. Next, make the sugar glue by cooking down 2 cups of sugar in a pan over medium to high heat. You’ll know it is done when you drop a small amount into a glass of water, and it forms a ball. Once sugar is completely melted down, turn off the heat to avoid burning. If the sugar cools too much, it is no longer runny, then just turn the stove back on to low until it has become runny again.
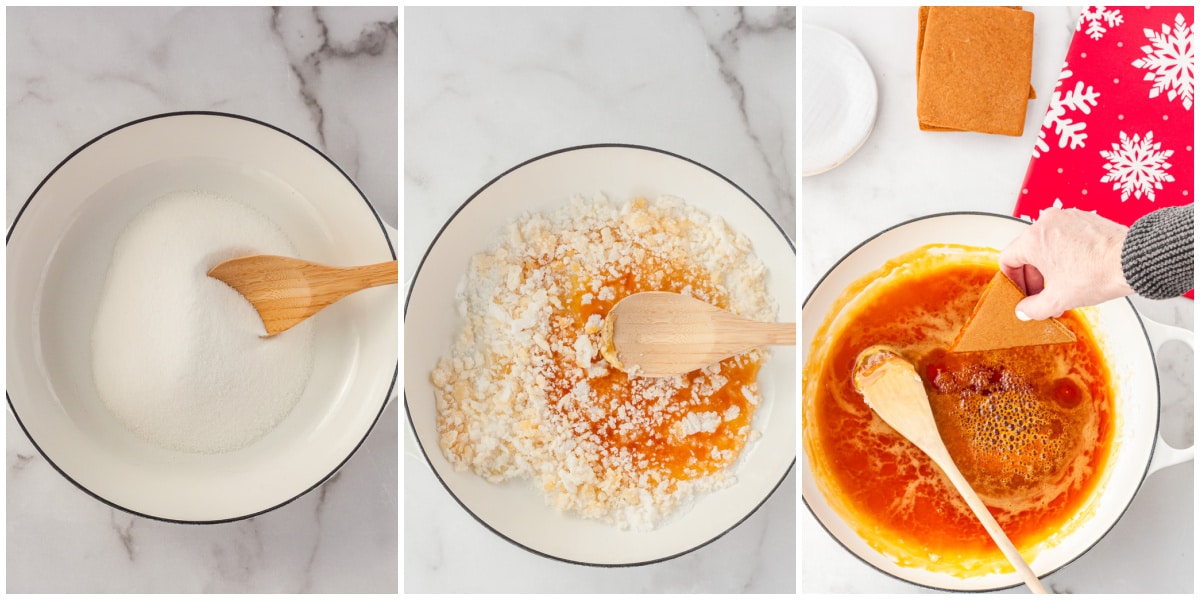
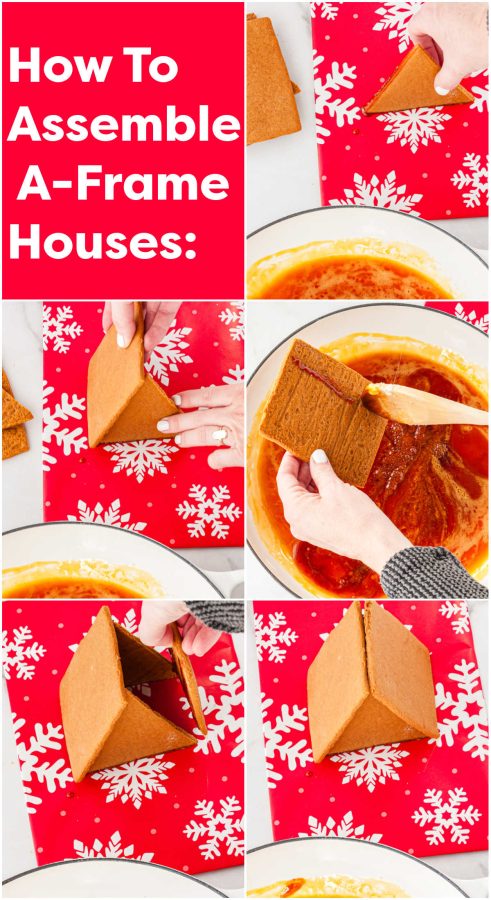
Next, work quickly, dip the base of the front piece of the house in the glue, and place it on your surface’s desired location. Then, use one side piece, dip the base and one side, and attach it to the house’s front. Do the same for the other side piece. Next, using the back piece, dip the base and drizzle some sugar from a spoon down either side of the back piece before attaching it to the side pieces. Drizzle sugar glue down the backside of the roof pieces and place it on the top of the houses. Use sugar glue to attach the door in an open position.

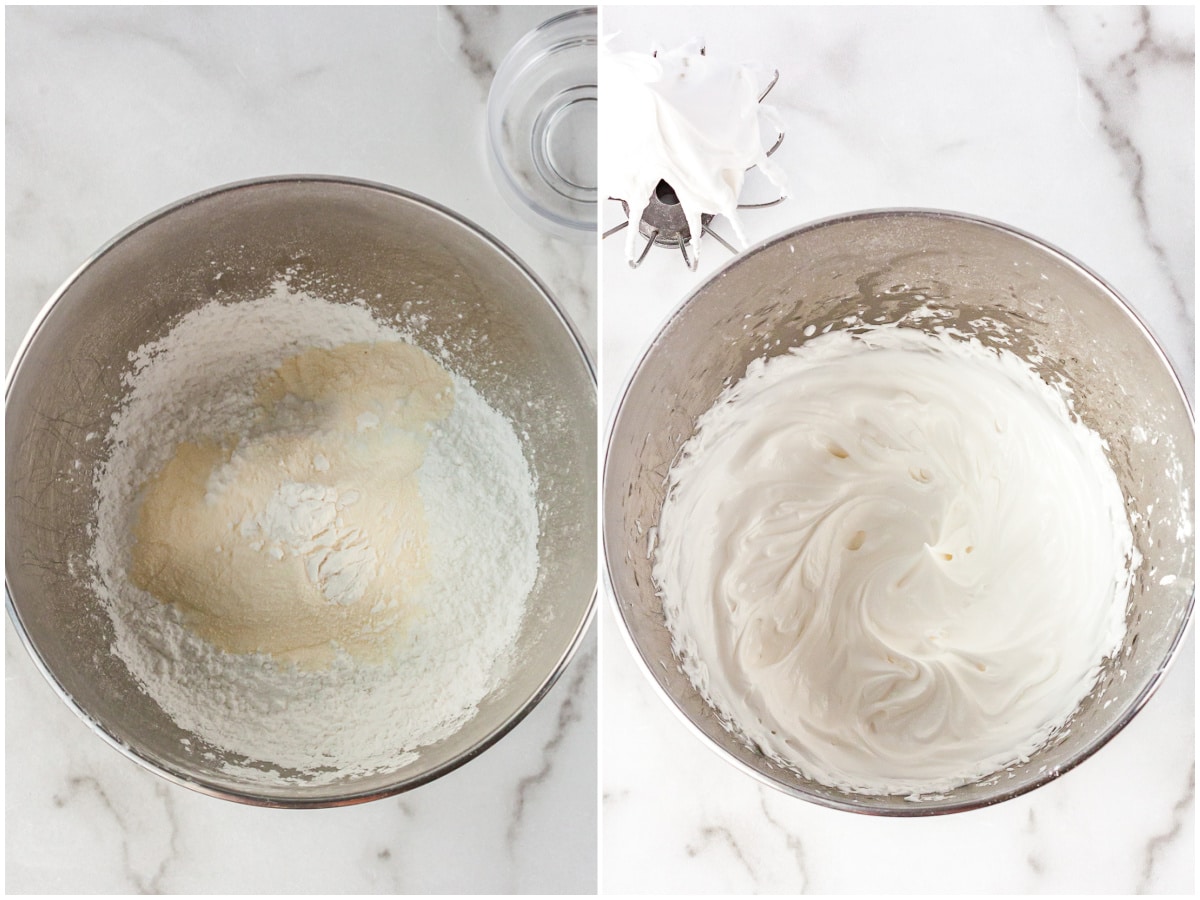
To make the royal icing, beat all ingredients on high speed for 7-10 minutes. Use immediately. Cover unused icing with a damp dishtowel or damp paper towel to keep the frosting from drying out – as this icing cannot be reconstituted once it has been dried out.
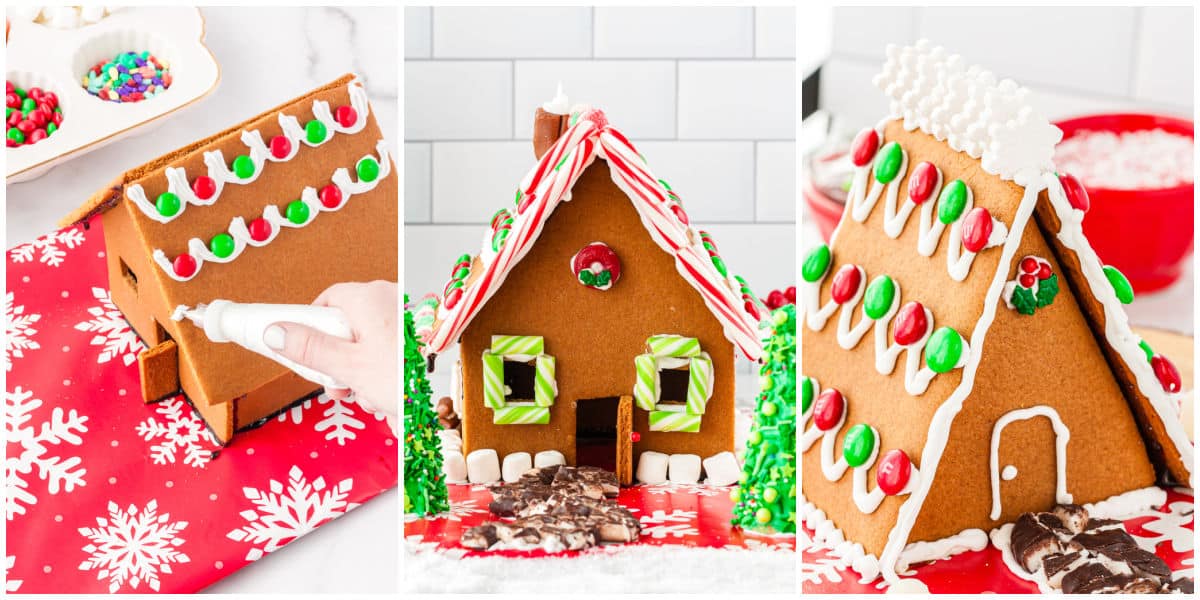
Finally, have fun decorating the homemade gingerbread houses to your liking. We like to invite friends or family over to enjoy the fun!
Recipe Variations and Substitutions
You can substitute 3 egg whites for the Wilton Meringue powder.
How To Make Gingerbread Houses Easier:
The recipe isn’t exactly hard; it’s just time-consuming with a lot of moving parts. To make things easier, we suggest breaking down the recipe over a few days. Here’s a timeline we usually follow:
***If you live in warm, humid climates (like Florida), you need to assemble and decorate the houses within a day or two before the gingerbread starts to get soft.
Day 1: Print off the gingerbread house template, trace it onto cardboard pieces, and cut them out.
Day 2: Make the gingerbread dough. Roll it out, cut, bake, and trim the gingerbread pieces.
Day 3: Wrap sturdy cardboard pieces in foil or holiday wrapping paper for gingerbread houses’ base.
Day 4: Assemble the houses using sugar glue. Keep them in a safe place overnight.
Day 5: Make the royal icing and invite friends or family over to decorate the gingerbread houses!
Gingerbread House Recipe Pro Tips:
- Be careful when handling the sugar glue, as it is very hot. We do not recommend letting children assist with the sugar glue to avoid burning themselves.
- If the dough is very sticky, that’s okay; be sure to lightly flour the surface and rolling pin until it no longer sticks to the surface or rolling pin.
- We highly recommend baking the pieces on parchment paper. You won’t get as many broken pieces as you try to get the pieces off the cookie sheet.
- When placing the template on the dough before cutting, be sure to place it with the print side down as it has a coating on it to help it not stick to your dough. Try not to put much pressure on the template so it is easier to take off the dough.
- To make life easier, only trim pieces that need to be flush with another surface; for example, there is no need to trim the roof pieces as they do not need it, but the roofline of the front and the back pieces need a flat surface for the roof to sit flush. The ‘A-frame’ style will need to have the triangle pieces trimmed after coming out of the oven, or the ‘roof’ pieces will not sit flush against each other.
- We prefer to cut the shapes on parchment paper as they keep their shape better than when you have to transfer them from the counter to the sheet. Parchment paper slipped around a lot with our rolling pin with handles, so if that’s the case with you, try rolling it partway on the counter, then move the dough to the parchment paper and use the rolling pin without holding the handles, and finish rolling the dough out on the parchment paper then cut shapes.
- We like to have ingredients on hand for another batch of Royal Icing. We find that when little kids decorate, they tend to go overboard on the icing, so mixing up another batch quickly is helpful!
- If trimming the edges for a ‘clean line’ look isn’t your thing, then feel free to skip the trimming step and just assemble your house with slightly rounded edges!
Storage Tips
- Serve: If you’re going to eat the gingerbread houses, we suggest eating them within a day or two.
- ***If you live in warm, humid climates, you must eat them the same day. We have family in Florida, and their houses start to get moldy and soft within two days.
- Store: Place pieces of wax paper or parchment paper in between each piece and place them in a Ziploc bag.
- Freeze: When stored as directed above, the gingerbread house pieces will keep in the freezer for up to a month before assembly.
Gingerbread House Recipe FAQs:
Yes! You can make 8 houses for about $1.20 per house. That is less expensive than the kits you can buy at the store.
You can prepare the dough ahead of time and store it in the freezer in an airtight container until you are ready to use it. Or you can freeze the baked pieces ahead of time. Just be sure the pieces are separated by wax paper and stored in an airtight container.
We like to do this in November before the busy holiday season starts. Then, we can pull it out when we are ready to assemble it.
Not too long in our house! We all pick at it, eating the yummy treats. If you store it in an airtight container in the freezer, it can stay fresh for up to 12 months. However, we like to keep it out for decoration and let the kids pick at it, so it doesn’t last long enough to start collecting dust particles.
The secret is in the sugar glue. It dries quickly, so you just need to make sure to assemble the houses quickly. The other tip is to keep the frosting covered when you are not using it. If it is not covered with a damp dishtowel or paper towel, it will dry out quickly, and that’s a no-go for decorating.
Get Kids Involved
Ages 2-3: Let them help organize the candy for decorating by placing them into bowls.
Ages 4-5: Let them help pour in ingredients for the frosting and dough. Guide their hands while you help them pipe the royal icing.
Ages 6-8: Let them measure the dough and frosting ingredients and help mix both. Let them come up with their own design for decorations and help them execute it.
Ages 9-11: Supervise them while preparing the entire recipe, except for the sugar glue construction – sugar glue is way too hot! Remember to have them read it twice before beginning the recipe. Help them print and cut out the stencil.
Ages 12+: Let them prepare the entire recipe, except for the sugar glue part – again, way too hot! You may want to supervise when they cut the dough with the stencil before and after baking, as this step can be tricky.
Budget Tips
- The estimated price does not include the cost of candy to decorate the houses. We like to get our candy at stores like Winco to get just the right amount of candy you need to decorate the houses with.
- A great way to cut down on costs is by asking each family member or friend to bring some candy for decorating the house. Trust us; they will be more than happy to bring candy if it means they get a beautiful gingerbread house to take home!

Favorite candies for decorating homemade gingerbread houses:
- Use leftover Halloween candy to decorate
- Red and Green M&Ms
- Peppermints
- Colored sprinkles
- Candy Canes
- Red Hots
- Hot Tamales
- Dots
- Red and Green Spice Drops
- Kisses & Hugs
- Mini chocolate chips
- Various Christmas sprinkles
- Colored gumballs
- Make these Rice Krispie Christmas Trees to sit outside the houses
- Any festive holiday candies!
GINGERBREAD HOUSE TEMPLATES
Head over to our Google Drive folder to get the various gingerbread house printable templates.
More From Easy Budget Recipes
Homemade Gingerbread Houses Recipe
 Recipe Cost 9.05 Serving Cost 1.13
Equipment
- mixing bowl
- rolling pin
- parchment paper
- paring knife
- baking sheet
- 10-inch frying pan
- handheld mixer
Ingredients
GINGERBREAD:
- 1 cup vegetable shortening
- 1 cup granulated sugar
- 1 cup molasses
- 2 Tablespoons white vinegar
- 1 large egg beaten
- 5 cups all-purpose flour
- 1 ½ teaspoon baking soda
- 2 teaspoons ground ginger
- 1 teaspoon cinnamon
- ½ teaspoon salt
HOUSE GLUE:
- 2 cups granulated sugar
ROYAL ICING:
- 6 teaspoons Wilton Meringue powder
- 6 Tablespoons water
- 4 cups powdered sugar
Instructions
PREP THE TEMPLATE:
- First, print off the Gingerbread House template and then cut it out and trace it onto a cereal box, and then cut that out, too.
MAKE THE GINGERBREAD DOUGH:
- Next, mix together the shortening, sugar, molasses, and vinegar in a large mixing bowl. Then mix in the egg.
- Mix dry ingredients and add to the molasses mixture, ensuring you mix it well.
ROLL OUT AND CUT THE DOUGH:
- Next, roll dough onto parchment paper and cut out the gingerbread house pieces except for the windows and doors using a paring knife. You will cut the windows and doors out after the gingerbread pieces are done baking. Pick up the parchment paper and place it on a cookie sheet after cutting the shapes.
BAKE THE GINGERBREAD HOUSE PIECES:
- Bake at 350 degrees for 11-14 minutes for the larger pieces and 8-10 minutes for the smaller pieces. Gently place the house template back on the baked shapes and quickly re-cut edges for straight lines. ‘A-frame’ style will need to have the triangle pieces trimmed after coming out of the oven or the ‘roof’ pieces will not sit flush. Next, cut out the windows and door.
PREP CARDBOARD BASES:
- Wrap a piece of sturdy cardboard (Amazon boxes or Pizza box lids work great) in foil.
MAKE THE SUGAR GLUE:
- Make the sugar glue by cooking down 2 cups of sugar in a 1-inch frying pan over medium to high heat. You’ll know it is done when you can drop a small amount into a glass of water, and it forms a ball.
CONSTRUCT THE HOUSES USING THE SUGAR GLUE:
- Next, work quickly and dip the base of the front piece of the house in the glue and place it on the desired location of your surface.
- Then, using one side piece, dip the base and one side and attach it to the front of the house. Do the same for the other side piece.
- Next, using the back piece, dip the base and drizzle some sugar from a spoon down either side of the back piece before attaching it to the side pieces.
- Drizzle sugar glue down the backside of the roof pieces and place on the top of the houses. Use sugar glue to attach the door in an open position.
MAKE THE ROYAL ICING:
- In a large bowl using a handheld mixer, or using a stand mixer fitted with the whisk attachment, beat all of the ingredients together on low until the powdered sugar is absorbed, increasing the speed to high, and beat for 7-10 minutes. Use immediately. Cover unused icing with a damp paper towel to keep the frosting from drying out.
DECORATE:
- Finally, fill the piping bags fitted with round piping tips with the royal icing. Decorate the houses using royal icing and candies of your choosing. Have fun, and take lots of pictures for family memories!


Amanda says
The instructions were so clear and easy to follow. Loved this Gingerbread House recipe!
Eileen Lowden says
Please issue a warning about how very hot the sugar syrup is. I sustained second degree burns on my hand while attempting to glue the gingerbread house pieces together. I do not recommend using the sugar syrup around children. Please be careful.
Jess Jankowski says
So sorry you burned yourself. Yes, please be careful when handling the sugar glue as it is very hot. We agree, we do not recommend letting children handle the sugar glue.
Nikki says
The recipe says to bring it to a boil. Do you put it in a pot and boil it? It looks like you are just mixing it in a bowl. Also, I can’t find the video for this recipe. Can you repost it? Thanks!!
Jess Jankowski says
Hi Nikki, thank you for catching our typo. We have corrected it. You do not need to bring the mixture to a boil, just mix it together in a large bowl. We are currently updating our video and will have it posted soon. Let us know if you have any other questions!
Jennifer says
thank you for such detailed instructions! If i need 4 large houses and 1 small, would 2 batches of this be enough?
Jess Jankowski says
You are so welcome! It’ll be tight to get all of that in 2 batches but we think you could get 4 large houses and an A-frame with 2 batches.
Wendy Caplin says
I made my own gingerbread houses last year. I look forward to using your recipe. We had teams of two with four houses and everybody had a blast. These were adults. I need to make four houses. So I need to double your recipe do I have to make it into batches or can I just double it and make one. Thank you so much.
Jess Jankowski says
Hi Wendy, We haven’t doubled it because our mixer is not big enough for a double batch but we don’t see why that wouldn’t be ok to do it in one batch if it will fit in your mixer. Enjoy!
Patti says
This is fantastic and so much easier than the other recipe I tried. You are a rock star! My 16 year old granddaughter is having 9 friends over to make gingerbread houses and we are using this recipe. Thanks for the doubling of the recipe. I didn’t have to use my brain.
Jess Jankowski says
LOVE this! So happy you found our recipe and what a fun party!
Miriam says
Thank you so much for sharing this! I definitely wouldn’t have dared this recipe if Beth hadn’t seemed so calm and reassuring in the video. All the tips were super helpful, especially the advice to do it over several days, and our house came out fantastic. I just hope I cleaned the pan the right way after the sugar glue hardened in it, haha. (Scraped out what I could then boiled water in it to make a simple syrup and dumped that down the sink.)
Jess Jankowski says
Miriam, thank you so much for your kind words! We love that our video helped you. We agree…Beth is the best one for helping you make these gingerbread houses! We love this tradition and that we were able to share it with you!
Sue says
Quick question. Mine are spreading and when I try to recut after baking they are cracking. What happens when I eliminate the baking soda. It tastes great and easy to measure out. I have to make a lot of houses for a class
Jess Jankowski says
Hi Sue, sounds like a fun event you have happening! We have not ever made it without baking soda, so we are not sure what happen if you leave it out. As for the cracking, it’s best to trim the edges when they come right out of the oven and the pieces are warm and easily cut. We have made these for a crowd and have found that it was faster to only trim the pieces that were going to be ‘glued’ to the base (i.e bottom of front and back, bottom of sides, and bottom of door). This will leave your pieces with slightly rounded edges but find that they will still ‘glue’ fine, they just won’t have tight seams where the pieces connect. If you watch the video on the post, that house was not trimmed so you can see how it will look not trimmed up. We think they still look great, you will save yourself some time, and people will love decorating them. Tell us how it goes!
Briana says
Hi! There are templates for large and small houses. If I prepare the dough according to the recipe, which size template should I use? Thanks!
Jess Jankowski says
Hi Briana, you can use either. If you do the large template you will have enough dough to make 2 houses. If you do the small template you will have enough dough to make 4 small houses. Have so much fun!
Angela says
So much great information here. There is no way that our gingerbread houses are going to fail this year!
Jess Jankowski says
They will be great! Thanks for stopping by.
Shanna | Modernmealmakeover says
These were so much fun to put together. I was a great activity to bring in the Christmas season.
Jess Jankowski says
So happy you enjoyed it!
Jessie says
This is so helpful! My kids and I have a tradition of making a couple of gingerbread houses together, but I always buy the kits. Your template and directions are so well written…. I think I’m going to try to bake them off myself this year!
Jess Jankowski says
Let us know how it goes!
Pam says
I have never considered making a gingerbread house from scratch but all of your tips have given me the confidence to give it a go!
Jess Jankowski says
Yes Pam! It will become a new favorite tradition for sure!